Friday, October 28, 2011

"Whiskey for my Elves...and beer for my rain-deer!"


I've been working on a lot of ornaments for the holiday season and this song by Toby Keith/Willie Nelson came to my mind when I had all these guys lined up. They looked they were in a rowdy and happy mood! No two  ornaments are the same, but I am hoping they make people smile...and reach for their wallets! Thanks for looking!


Tuesday, October 4, 2011

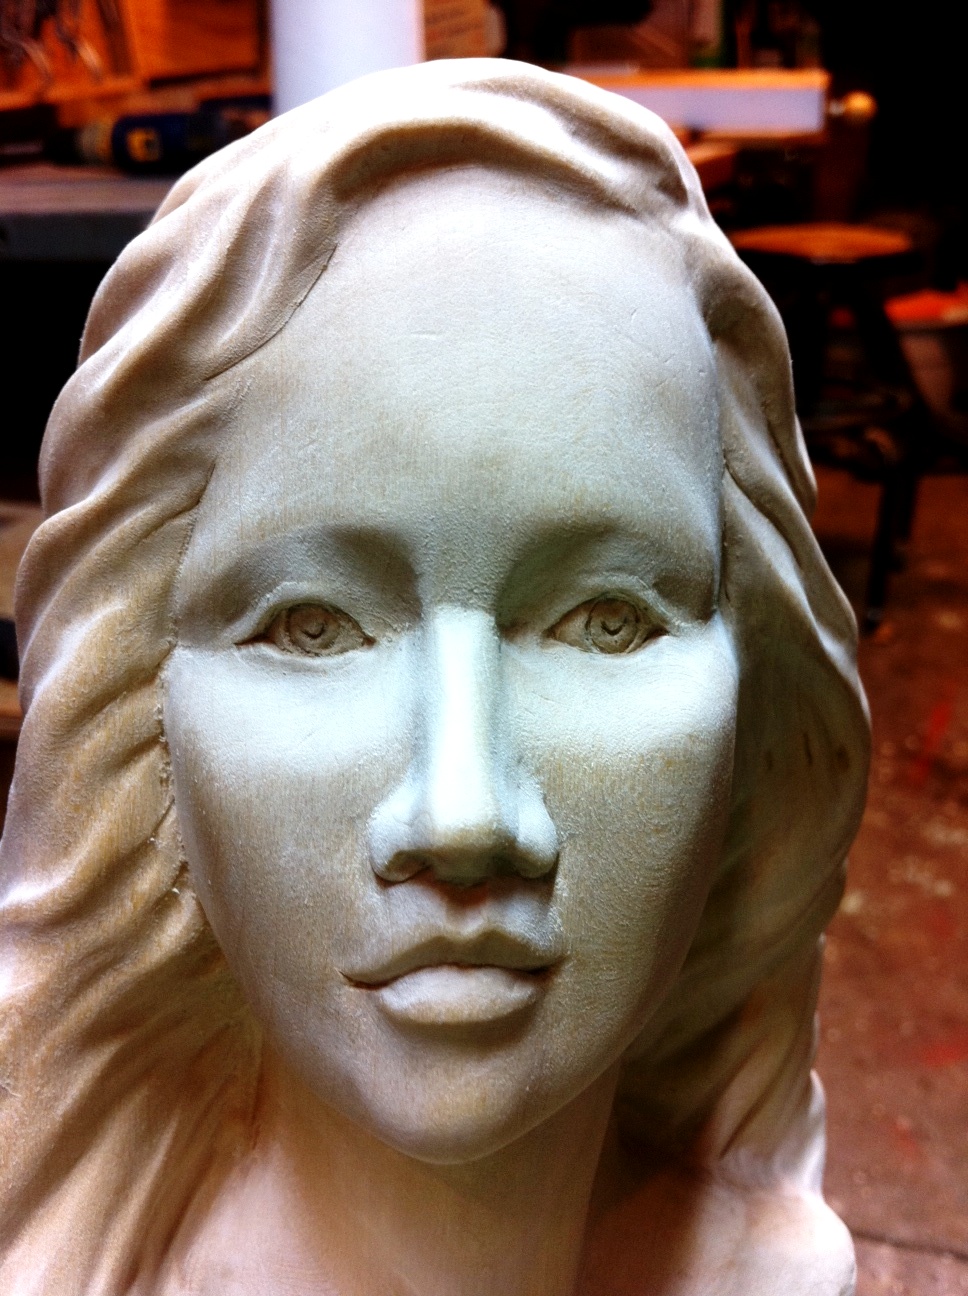
"Behind Blue Eyes" finished


I seem to have a habit of naming my carvings of ladies after songs and I’m not sure exactly why. My music tastes are random and I can’t sing or play an instrument. Maybe carving is how I sing, how I try to provoke a feeling or emotion in an audience? I don’t really start a carving with the intention of creating a particular look or appearance; I just start the basic shape of a head and different features and try to get the right shapes and placement blocked out, more of an exercise in form than in art. But, at some point, the nose or shape of the mouth or some element starts to take shape in a way that seems to grab me, that inspires the rest of the piece. I get drawn in trying to figure out how to correctly shape the beauty that I discover almost accidently. And as I work, a song or title will just come to me and the more I think about the song, the more something about it seems to fit the carving. I am not sure who this is or what she sees or what she may be thinking about. Maybe she hears the song that I hear? Thanks for looking!


Saturday, October 1, 2011

Eye brows and stuff

It took a bit, but I think I finally have the eye brows like I want them. I carefully drew them out and measured and researched them and did a bunch of thinks before I started cutting wood. I used a really small v gouge and carefully cut them in, making sure the hairs pointed properly. And I didn’t like it….didn’t look right, was too dark. So I tried my bristle sander and several other things to fix it up. I finally took knife in hand and cut them off and started over. I had to reshape the brows and sockets and one eye lid and get them evened out before trying again. This time, I used a small ball stylus (used for embossing metal) and did the eye brows with that. With a little force, it leaves a shape like a tiny u gouge and gives just the amount of shadow I was wanting. I like it now!


I cut the cherry block down for the base and shaped the bottom area of the carving to see how it looks. Nothing is glued down at this point, in case I want to change something. I’ll look at it some more and sand it a little better before thinking about finishes. The cherry will really look good when I hit with some oil. Thanks for looking!


Thursday, September 29, 2011

More progress

Still working away on this, but I try to go slowly at times to make sure I see things that need to be changed. I sometimes rush through things and don’t always pick up on mistakes until after they are finished and sitting on a shelf. Some people recommend looking at your work in a mirror to help pick up on problem areas, but I often see things in photos of my work that I don’t always see when holding it in my hand. So I am trying to correct a few details. Someone may have mentioned it a previous post, or you may have noticed, that the young lady has no eyebrows! I have lightly drawn them in and want to make sure I have them properly placed and symmetrical. I am still researching eye brows…. who knew that you can buy little templates to assist you in evenly shaping your brows! I may make one to make sure these match, but I’ll try measuring first. I am not sure if it is my camera angle or what, but in some photos, the nose looks really wide and in others, not so much. So I have tried reducing the wings of the nostrils a bit. What do you think?


If you look at the right side of the face in previous blog entries, you may have noticed that her hair appears to be growing directly out from her face, a highly unusual phenomenon. So I have moved the hair back to make the forehead more even on that side and to expose a bit of the ear on that side. This looks a bit more natural for the hair growth. I still need to work some more on the hair under the ear on that side to make sure it looks like it is coming from where it really
grows.


And here is the other side with a few changes. It still looks much the same despite all the changes on the other side. Overall, it seems more balanced now, but hopefully with the same feel as before.


I started looking through my wood to try and figure out something for a base. I tried this tall piece of cherry, thinking that the longer shape might add a sense of a tall slender figure. Too tall maybe? (according to my wife) What do you guys think? Thanks for looking!

Monday, September 26, 2011

Behind Blue Eyes progress


I have spent most of the week working on the hair and deciding how I wanted to do the eyes. I had carved in the main shapes of the hair starting with larger #11 u gouges and working down to smaller sizes, with a few v tool and knife cuts thrown in. You want the hair to flow correctly and part of that is remembering where the hair grows on the head. It just doesn’t look right if you show it growing in front of the ears or sideways out from the neck! I like to make hair look softer, by sanding a lot of sharp angles away. It is similar in some ways to the flowing shapes you see in Andy’s boxes.


Some carvers are adamantly opposed to sanding their work, but I like the way certain parts, like faces and hair, look when sanded. Only my tastes and preference though! I used small drum sanders, bristle sanders, cone sanders, and hand sanding to make the hair look less like individual clumps and more of a flowing mass. I may a do a blog entry on the 5 or six different types of sanders I used, if any one is interested. Once I got the hair more like I wanted it, I started cutting in the eyes. I used a compass to measure from the center line of the nose to make sure I had the center of each I exactly the same, then I used the compass to draw the pupil using that center point. This kept the eyes located symmetrically and of equal size, which can be difficult to achieve, at least for me, without measuring.


I normally carve and undercut the entire pupil and then carve a deeper center hole for the iris. This creates good shadows and a dramatic eye, but I wanted to do these a little different. I wanted to make the eyes appear lighter, to give the impression of being blue, and I wanted to try and add highlights to the irises.


There are different methods of doing this, but basically you want to leave a bit of wood that indicates light reflecting off the eye. It is easy for me to mess this up, by cutting off too much, but I gave it a go using this method and it looke pretty good to me! I have more sanding to do and I am now thinking about how to do the bottom of the piece and how to do a base that will complement it. Thanks for looking!